Protect you domains from spoofing using DMARC (AWS Route 53 and Gmail)
Intro
What exactly is DMARC and why do you want it? DMARC stands for Domain-based Message Authentication, Reporting & Conformance. DMARC is an email validation framework designed to detect, prevent and provide reporting of email spoofing.
As such it is all about the verification of the From: email header field. Implementing DMARC is the best way to defend from phishing and spoofing attacks.
Before we dive into it lets talk about what happens when an SMTP email gets sent:
NOTE
SMTP has no facility to authenticate senders or message content. This fact is often used in email spoofing, i.e. creating emails with forged sender address.
By an analogy to the traditional snail-mail, the addressing information in email is called the envelope addressing and contains two pieces of information:
-
Return-Path: header - normally not visible to the end user, and by default no checks are done that the sending server is authorized to send emails on behalf of that address.
-
Received: header - also normally not visible to the end user, specifies to which address the email is delivered to.
If the receiving mail server doesn’t detect any problems with either if these headers, it proceeds by sending a DATA command and sends several other headers including:
- From: - this is the address visible to the recipient, but again not verified in any way.
- Reply-to: and (sometimes) Sender: - similarly not checked.
The end-result is that the end user sees the email as coming from the address in the From: header, but this is not neccesserily so, see this excerpt from headers of a spoofed email:
Return-Path: <filip@example.com>
Received: from mail05.parking.ru (mail05.parking.ru. [195.128.120.25])
        by mx.google.com with ESMTP id h138si2730943lfg.51.2018.02.20.07.26.55
        for <filip@mydomain.com>;
        Tue, 20 Feb 2018 07:26:55 -0800 (PST)
Here we can see that 195.128.120.25 has sent an email on behalf of filip@example.com to filip@mydomain.com.
But I never authorized it to do so!
DMARC compliancy
DMARC prevents direct domain spoofing, by notifying receiving server that their messages are protected by SPF and/or DKIM policies and telling them what to do with a message if it fails these policy checks (we will discuss SPF and DKIM soon). DMARC also has a built in reporting mechanism, capable of generating bulk reports of messages sent on behalf of the protected domain that fail or comply the DMARC policies.
DMARC has also the concept of identifiers alignment. In the case of SPF it means that the domain portion of the Return-Path: has to align with the domain found in the From: header. For example:
Return-Path: filip@example.com
From: filip@subdomain.example.com
If DMARC is set to protect the example.com domain in a strict mode, an email from subdomain.example.com would fail as the domains do not match exactly. However, in the relaxed alignment mode DMARC would pass, because the root domain matches.
Notice that in both cases SPF itself would pass.
In the case of DKIM, identifier alignment means that the domain specified by the d= field of the DKIM headers has to pass, and align to the domain found in the From: header. For example:
d= "example.io"
From header: filip@subdomain.example.io
In the above example, DMARC would fail both in strict and relaxed mode.
To sum up this rather long introduction - to be DMARC compliant, an email from a certain domain needs to
- Pass DKIM and/or SPF
- Have it’s identifiers aligned according to one or both of the policies.
Practical example
For this example we will assume Amazon Route 53 is used for the DNS, and Gmail for mail, which is a pretty standard setup for most organisations. We will also comply with DMARC via both SPF and DKIM, since well, you should.
Create SPF record
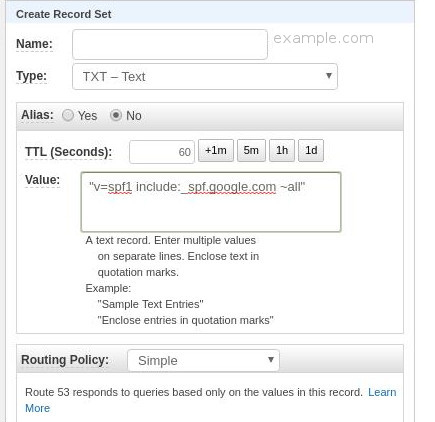
SPF (Sender Policy Framework) is a type of DNS record that identifies which mail servers are permitted to send email on behalf of your domain. Go to AWS console, select Hosted Zones, select the domain name you wish to set the policy for and create a following record to authorize Gmail to send emails on your behalf:
Name: example.io
Type: TXT
Value: "v=spf1 include:_spf.google.com ~all"
Routing Policy: Simple
If you wish add more mail servers add their IP4 or IP6 addresses before, for example:
"v=spf1 ip4:192.168.0.1/16 include:_spf.google.com ~all".
Consult SPF record syntax help for details.
This is more or less what you should see as a record:
Authenticate email with DKIM
DKIM (DomainKeys Identified Mail) is a standard that allows senders to sign their email messages and ISPs to use those signatures to verify that those messages are legitimate, and have not been modified by a third party in transit. An email message that is sent using DKIM includes a DKIM-Signature: header. Example:
DKIM-Signature: v=1; a=rsa-sha256; c=relaxed/relaxed;
        d=example.com; s=20150623;
        h=mime-version:from:date:message-id:subject:to;
        bh=BaDzsiGZzGgIB8Oz3sFCgi4g+XuqzjZWmfo8RsjTEy8=;
        b=coBo72Ry12Zw9SY4WsHkWywQwUYEsAVpQodz8CKeP75ylKOc4Zw8Dh4b4flh6nNf7t
         UVyBSPki6hoxkXt37lxxW6gCPddYSiwo3I5itHBO01hBN46ldK2x7lUOiBeuIBMZwbV4
         3MmCkPOOoJtILqMMrSuk8IeVvqaxInDYbs7K/Oi0v4RlVSk6Qo8bJkJZ0c31Fexjetww
         pBVaqz5iflO8/nr9pZviS7Go/zAQ7dfxEMxvU4oW2EDr4ZQzHBNsa9Sh60sUpZ7nuBXz
         xgX8yPByu8KrnFoyTm6Papf8JVqplmf+8Hx5q07JRCpSj17GRWOInkOBDFccfi/h0fis
         ysjA==
Good news is Gmail allows the admin account to turn DKIM in a few simple steps, so I won’t repeat them here.
Publishing DMARC
NOTE
Interesting enough technically you don’t need to comply with SPF or DKIM or even have your identifiers aligned to publish a DMARC record - in which case however you only get the reporting capabilities, without any actionable results.
We will use a DMARC aggregator app to get weekly reports, instead of annoying daily raw status reports. Go to https://dmarc.postmarkapp.com/ and register with an email that you want to use for receiving reports. This could be a specific email or your (the DevOps 1) email.
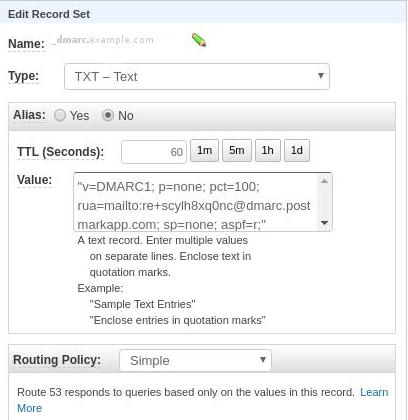
Next create a following DNS record in the AWS Console:
Name: _dmarc.example.com
Type: TXT
Value: "v=DMARC1; p=none; pct=100; rua=mailto:re+scylh8xq0nc@dmarc.postmarkapp.com; sp=none; aspf=r; adkim=s;"
Routing Policy: Simple
Which should look like this:
Note that we are setting the policy to p=none, which translates to “only gather reports and send them to the postmarc email” (rua= entry), but take no action.
The best practice is you should start with this policy, and only afterwards progress to p=quarantine (put messages failing the DMARC policy into SPAM) and finally p=reject (do not deliver offending messages).
This way you can gradually assure nothing wrong is happening to your organisations email communications.
We also specify aspf=r which stands for the relaxed alignment mode we talked about here and adkim=s which is a strict DKIM policy.
Official DMARC documentation does a great job of explaining the syntax.
After the TTL time you specified in the DNS record, you can check if your DMARC record has been published with:
$ nslookup -type=TXT _dmarc.district0x.io
You should see something like the following:
Server:		127.0.1.1
Address:	127.0.1.1#53

Non-authoritative answer:
_dmarc.example.com	text = "v=DMARC1; p=none; pct=100; rua=mailto:re+scylh8xq0nc@dmarc.postmarkapp.com; sp=none; aspf=r;"
Which correpsonds to the published settings. Postapp has also an HTTP API if you like to automate things that you do with your reports (and who doesn’t).
Congratulations! Now you have full control over who is sending email messages on your behalf.
1: Sounds proud!