Creating a serverless application in ClojureScript
Intro
Serverless frameworks have been gaining a lot of tracktion recently, delivering on the the promise of infrastructure-as-code computing model, where your applications run in ephemeral, stateless, pay-as-you-go cloud containers. As such they are equally suitable for large APIs, as well as for your next toy-project.
In this blog post we will look into creating a serverless application, by writing a graphql endpoint running as a function on cloud infrastructure. We will focus on AWS Lambda, although in principle the same application could be deployed to any other cloud vendor server. For writing the application code we will use ClojureScript, for compiling it shadow-cljs and finally we will use the serverless framework to deploy it.
Prerequisites
For the duration of this tutorial I will assume you have an AWS, as well as some basic knowledge of how to move around the AWS console.
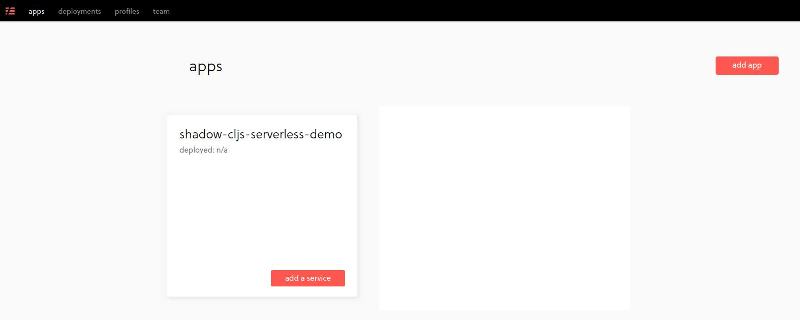
Let’s start by creating a serverless account by navigating to https://dashboard.serverless.com/. From this dashboard go ahead and create your first application. This what you should be able to see once finished:
Now install the serverless CLI tool distributed as an npm packages:
npm install --global serverless
It’s a CLI tool for running task and managing your applications.
Writing the application code
Now lets write the code for our application.
As mentioned in the introduction we will use shadow-cljs to compile the application, so lets start by creating shadow-cljs configuration file shadow-cljs.edn:
{:source-paths ["src"]

 :dependencies [[cider/cider-nrepl "0.22.0-beta12"]
                [cider/piggieback "0.4.1"]]

 :nrepl {:middleware [cider.piggieback/wrap-cljs-repl]}

 :http {:port 3449
        :host "0.0.0.0"}

 :builds {:api
          {:target :node-library
           :exports {:handler api.graphql/create-handler}
           :js-options {:js-package-dirs ["./api/node_modules"]}
           :output-dir "api"
           :output-to "api/graphql.js"}}}
This is a pretty standard configuration, but what is important we will use a :node-library target, together with a named export to avoid name munging by the compiler.
What this means is that the nodejs runtime environment will be able to access the compiled code by this exact name. e.g:
var handler = require('./api/graphql.js').handler;
Also notice the :js-options key we use to specify a separate npm node_modules directory.
This is because we don’t want to include development packages, such as shadow-cljs itself, when deploying the application to the cloud.
We will talk about this when discussing how to configure serverless.
Next thing we need is npm dependencies for the development as well as some handy shortcuts, so lets create a package.json file:
{
  "name": "shadow-cljs-serverless-demo",
  "version": "0.0.1",
  "scripts": {
    "api:watch": "shadow-cljs watch api",
    "api:release": "shadow-cljs release api"
  },
  "devDependencies": {
    "shadow-cljs": "^2.8.52"
  }
}
GraphQL resolvers
The purpose of this post isn’t to introduce GraphQL, so if you need a refresher there’s plenty of resources online that do an excelent job of just that. Lets just say that a backend utilizing one of the GraphQL frameworks will typically consist of:
- a schema that describes how to ask for the data.
- some type of web-server that replies (or manipulates) to these queries with existing data.
Our toy API will have only one endpoint called hello, which given a list of names as an argument responds with a greeting (a classic hello-world of sorts).
Here’s the schema:
schema {
    query:Query
}

type Query {
    hello(names: [String]): [Greeting]
}

type Greeting {
    id: ID!
    text: String
}
Here’s how we could implement a resolver for the hello endpoint:
(def resolvers {:Query {:hello (fn [_ args _]
                                 (let [{:keys [:names]} (js->clj args :keywordize-keys true)]
                                   (clj->js (map (fn [n]
                                                   {:id n
                                                    :text (str "hello " n)})
                                                 names))))}})
And here’s how we can create a web-server running in an AWS lambda environment using ApolloServer:
(ns api.graphql
  (:require ["apollo-server-lambda" :refer (ApolloServer)]))

(defn create-handler [event context callback]
  (let [handler (js-invoke (new ApolloServer (clj->js {:typeDefs schema
                                                       :resolvers resolvers})) "createHandler")]
    (handler event context callback)))
Configuring Serverless
At the beginning of this section we talked about splitting the development and runtime dependencies using shadow-cljs configuration options. Before we can run or deploy our application we still need to define those dependencies, as well as configure serverless.
Inside the api/ output directory, where shadow-cljs produces the compiled artifacts, create package.json file:
{
  "name": "api",
  "version": "0.0.1",
  "scripts": {
    "offline": "sls offline --skipCacheInvalidation",
    "deploy": "sls deploy"
  },
  "dependencies": {
    "apollo-server-lambda": "^2.9.5"
  },
  "devDependencies": {
    "serverless-offline": "^5.12.0"
  }
}
apollo-server-lambda is the sole runtime dependency we need in order to create the apollo graphql server.
serverless-offline is a plugin which make sit possible to run the project locally, and we pass the skipCacheInvalidation flag to avoid confusing shadow-cljs hot-reloading.
Moving on it’s time to configure serverless. Serverless configuration files are (unfortunately) written in yaml:
org: fbielejec
app: shadow-cljs-serverless-demo
service: api

provider:
  name: aws
  runtime: nodejs10.x
  region: us-east-2

functions:
  graphql:
    handler: graphql.handler
    events:
    - http:
        path: graphql
        method: post
        cors: true
    - http:
        path: graphql
        method: get
        cors: true

plugins:
  - serverless-offline

custom:
  serverless-offline:
    port: 4000
To sum up this config file we define an api service, which is a part of the app we previously created in the serverless dashboard.
We deploy it on AWS as a lambda (function) called graphql.
handler corresponds to the export we defined when configuring shadow-cljs and is formatted as <FILENAME>.<HANDLER>.
At the end of the config file we specify how to run the project in the development (offline) mode on port 4000.
Testing the project in offline mode
With all this in place we can run the project, by installing development dependencies, starting a watcher and creating runtime using the serverless-offline plugin:
yarn && yarn api:watch
cd api/ && yarn offline
You can now open the graphql console on http://localhost:4000/graphql and ask the server your first query:
query {
  hello(names: ["Janusz", "Grazynka"]) {
    id
    text
  }
}
Deploying application
Let’s see how we can actually deploy this application to the AWS cloud.
You should start by naviagting to the AWS IAM console and creating a separate user account.
Make sure it has AdministratorAccess permission, either attached directly or by using a group.
For programmatic access generate an access key for that account from the Security Credentials tab.
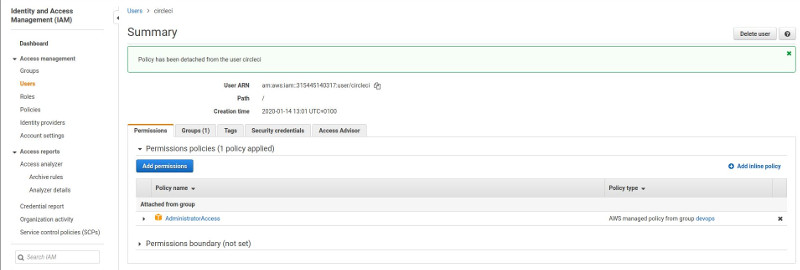
For security reasons you can also disable the AWS console access for this account. Don’t forget to copy the acces key id and secret, you will need them later!
You can now configure serverless with the AWS credentials that you just created:
serverless config credentials --provider aws --key <AWS_ACCESS_KEY_ID> --secret <AWS_SECRET_ACCESS_KEY>
We have all we need to deploy the application. Let’s compile the code and deploy it:
yarn api:release
cd api && yarn deploy
Once finished you should see something similar to the output below:
$ Serverless: Stack update finished...
$ Service Information
$ service: api
$ stage: dev
$ region: us-east-2
$ stack: api-dev
$ resources: 20
$ api keys:
$   None
$ endpoints:
$   POST - https://hqu5sdl2qf.execute-api.us-east-2.amazonaws.com/dev/graphql
$   GET - https://hqu5sdl2qf.execute-api.us-east-2.amazonaws.com/dev/graphql
$ functions:
$   graphql: api-dev-graphql
$ layers:
$   None
$ Serverless: Publishing service to the Serverless Dashboard...
$ Serverless: Successfully published your service to the Serverless Dashboard: https://dashboard.serverless.com/tenants/fbielejec/applications/shadow-cljs-serverless-demo/services/api/stage/dev/region/us-east-2
AS you can see we get the URL of the deployed endpoint. You can make a request to the deployed lambda usig curl, like so:
curl -X POST -H "Content-Type: application/json"  --data \
'{ "query": "{ hello(names: [\"Janusz\"]) { text } }" }' \
https://hqu5sdl2qf.execute-api.us-east-2.amazonaws.com/dev/graphql
and it should return the information you asked for:
$ {"data":{"hello":[{"text":"hello Janusz"}]}}
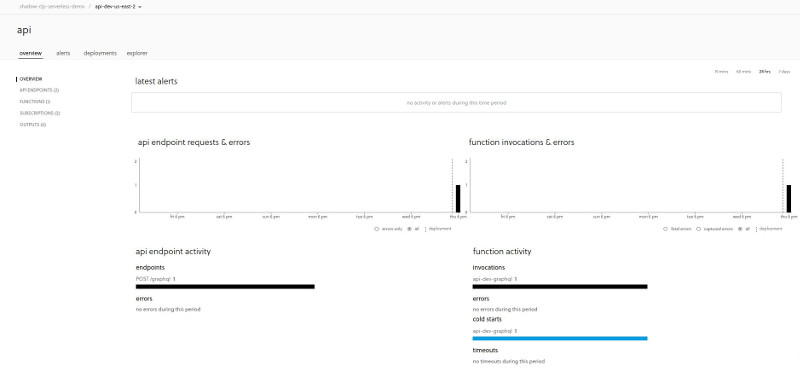
If you navigate to the serverless dashboard, you can also see some basic logs and information about the service:
Future steps
That’s it, hope you find it usefull. Complete source code for this tutorial can be found on github. In the next blog post we will look into automating the deployment of serverless services using a CI/CD pipeline.